A failed rear light on your 2014 Jeep Grand Cherokee may look like a simple bulb problem, but there is one important detail to know before you start pulling the lamp apart.
Not every rear light on this Jeep uses a replaceable bulb.
The rear body-side tail lamp and auxiliary liftgate tail lamp use LEDs, while the rear turn/stop and reverse lights use replaceable bulbs. That means the correct repair depends on which light has actually stopped working.
In this guide, you will learn how to identify the failed light, remove the tail light assembly, replace the correct bulb or lamp assembly, troubleshoot common problems, and avoid buying the wrong part.
Identify Which Rear Light Needs to Be Replaced
Before buying a bulb or complete lamp assembly, switch on the lights and determine exactly which function has failed.
Ask someone to stand behind the Jeep while you test the lights, or back the vehicle toward a garage door so you can see the reflection.
Check:
- Running or parking lights
- Brake lights
- Left and right turn signals
- Reverse lights
- Inner liftgate lights
- Outer body-mounted lights
Knowing the exact failed light can save you from replacing a perfectly good bulb or ordering an expensive assembly you do not need.
Tail Light vs Brake Light vs Turn Signal vs Reverse Light
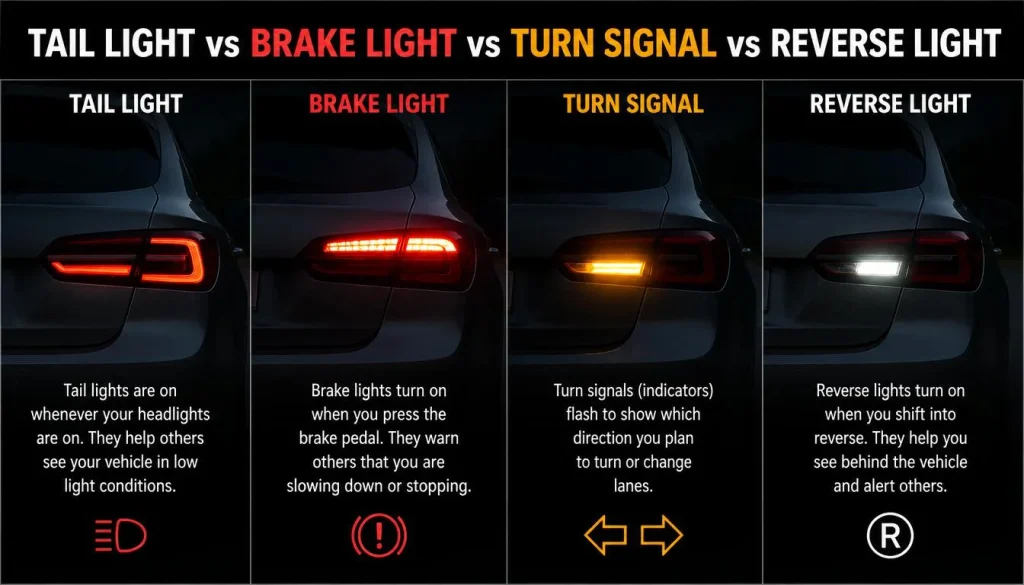
These terms are often used interchangeably, but they refer to different functions.
The tail light comes on with your parking lights or headlights.
The brake light becomes brighter when you press the brake pedal.
The rear turn signal flashes when you activate the turn signal.
The reverse light comes on when the transmission is shifted into reverse.
On the 2014 Jeep Grand Cherokee, the rear turn and stop function uses a replaceable bulb, while part of the normal tail-light function is LED.
Inner/Liftgate vs Outer Tail Light
The Grand Cherokee has rear lighting on both the body and the liftgate.
The outer lamps are mounted beside the liftgate opening. The inner lamps are mounted on the liftgate itself.
This matters because the removal procedure is different.
The outer tail light can usually be accessed after opening the liftgate and removing the exterior retainers. Replacing an inner liftgate lamp may require removing part of the interior liftgate trim to reach its mounting hardware.
Driver-Side vs Passenger-Side Tail Light
Complete tail light assemblies are normally side-specific.
Before ordering a replacement, verify whether you need:
- Driver-side outer lamp
- Passenger-side outer lamp
- Driver-side inner liftgate lamp
- Passenger-side inner liftgate lamp
Do not rely only on the appearance of an online product photo. Check the part description, mounting position, connector design, and vehicle compatibility.
What Bulbs Does a 2014 Jeep Grand Cherokee Use?
One of the most common mistakes owners make is assuming that every light inside the rear housing uses the same bulb.
They do not.
For the factory 2014 Jeep Grand Cherokee rear lighting system, common specifications include:
| Rear Light | Bulb or Light Type |
|---|---|
| Rear body-side tail lamp | LED |
| Rear turn/stop lamp | 3157 / P27/7W |
| Auxiliary body-side backup lamp | 7440 / W21W |
| Liftgate backup lamp | 921 / W16W |
| Auxiliary liftgate tail lamp | LED |
Always confirm the bulb already installed in your Jeep before buying a replacement. Previous owners may have installed aftermarket housings or converted certain lights to LEDs.
Rear Turn/Stop Bulb – 3157 P27/7W
The rear body-side turn and stop lamp uses a 3157-style dual-function bulb.
If your brake light or rear turn signal is not working but the normal tail lamp still illuminates, this is one of the first bulbs to inspect.
Auxiliary Backup Bulb – 7440
The auxiliary body-side backup lamp uses a 7440/W21W bulb.
If one reverse light is out, compare it with the light on the opposite side before replacing anything.
Liftgate Backup Bulb – 921
The backup lamp located in the liftgate uses a 921/W16W bulb.
Because the inner liftgate lighting is mounted differently from the outer lamp, access may require removing interior trim.
Are the 2014 Jeep Grand Cherokee Tail Lights LED?
Yes. Parts of the factory rear lighting system use LEDs.
Most importantly, the rear body-side tail lamp and auxiliary liftgate tail lamp are LED units.
This is why replacing a 3157 bulb will not fix every “tail light” problem. The 3157 bulb handles the rear turn/stop function. If the integrated LED portion of the lamp has failed, replacing the complete lamp assembly may be necessary.
Tools and Parts You’ll Need
The exact tools depend on whether you are replacing a bulb, the outer tail light, or an inner liftgate lamp.
For most jobs, gather:
- Correct replacement bulb or lamp assembly
- Plastic trim removal tool
- Small flat-head screwdriver
- Ratchet and socket set
- 10 mm socket
- Work gloves
- Safety glasses
- Microfiber cloth
- Flashlight
- Dielectric grease, optional
A plastic trim tool is especially useful because it reduces the chance of scratching paint or damaging interior panels.
Choose the Correct Replacement Part
Before ordering a tail light, confirm:
- 2014 Jeep Grand Cherokee compatibility
- Driver or passenger side
- Inner or outer position
- OEM-style or aftermarket design
- LED or halogen configuration
- Connector compatibility
- Trim-specific fitment when applicable
If you still have the original lamp, comparing the replacement part number with the old assembly is one of the safest ways to avoid ordering the wrong unit.
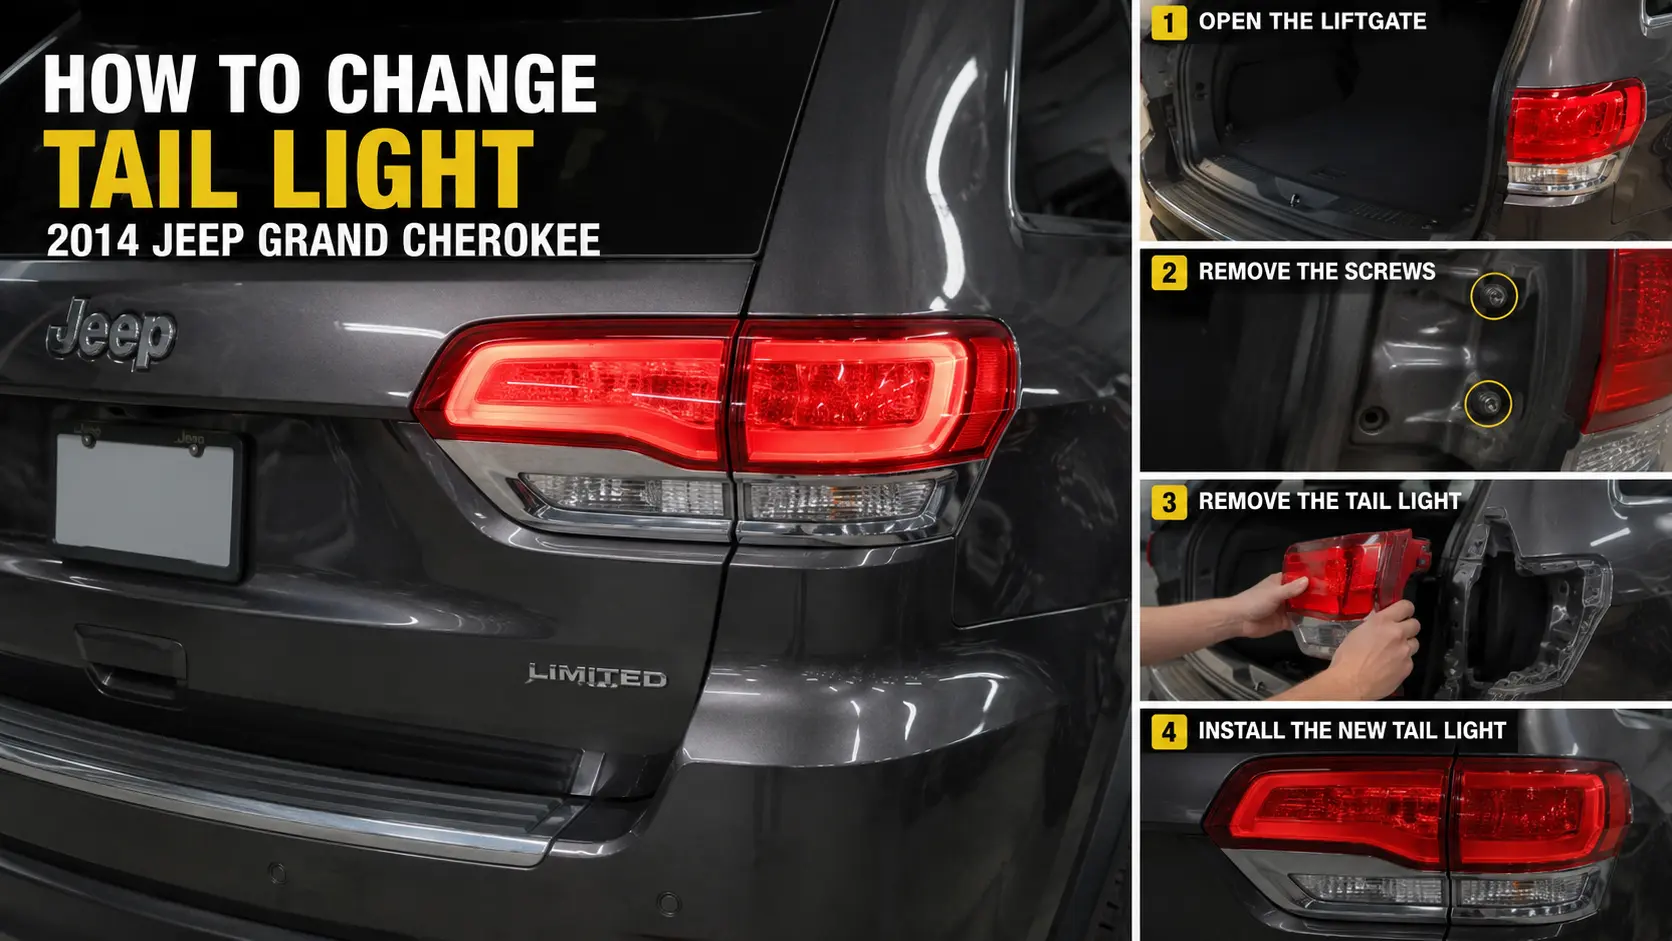
How to Change Tail Light on 2014 Jeep Grand Cherokee
The following procedure covers the common outer rear lamp removal process.
Work slowly. The lamp housing has locating pins and mounting points that can break if the assembly is twisted or forced sideways.
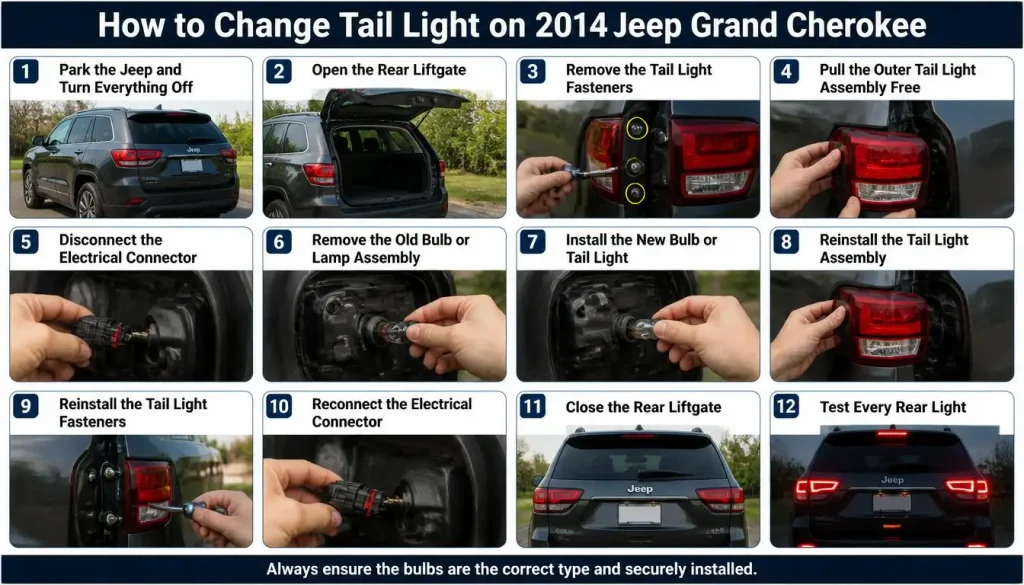
Step 1 – Park the Jeep and Turn Everything Off
Park the Jeep on a flat surface.
Shift into Park, apply the parking brake, switch off the ignition, and turn off all exterior lights.
Allow the old bulb to cool if the lights were recently used.
Step 2 – Open the Rear Liftgate
Open the liftgate completely.
Look along the inside edge of the outer tail light housing. You should see the retaining fasteners that secure the lamp to the body.
Step 3 – Remove the Tail Light Fasteners
Carefully remove the retaining clips or fasteners.
Keep them somewhere safe because you will need them during reinstallation.
Do not pry aggressively against the painted body panel.
Step 4 – Pull the Outer Tail Light Assembly Free
Once the visible retainers are removed, support the lamp with both hands.
Pull the assembly straight away from the body.
Avoid twisting it upward or sideways. The lamp may still be held by locating pins or clips, and forcing it at an angle can crack the housing or break a mounting tab.
If it feels stuck, gently work the assembly outward instead of using excessive force.
Step 5 – Disconnect the Electrical Connector
Locate the wiring connector behind the lamp.
Press or release the locking tab and separate the connector from the lamp.
Pull on the connector body, not the wires.
Inspect the plug while it is disconnected. Look for corrosion, melted plastic, loose terminals, or moisture.
Step 6 – Remove the Old Bulb or Lamp Assembly
If you are replacing a serviceable bulb, locate the correct bulb socket on the back of the assembly.
Rotate the socket in the release direction and pull it out.
Remove the old bulb carefully.
If the integrated LED tail lamp has failed, there may not be a normal replaceable tail-light bulb to remove. In that situation, the lamp assembly itself may need to be replaced.
Step 7 – Install the New Bulb or Tail Light
For a bulb replacement:
- Compare the new bulb with the old one.
- Install it securely in the socket.
- Reinsert the socket into the housing.
- Rotate it until it locks.
Avoid touching the glass of bulbs that should remain free of skin oils.
For a complete assembly replacement:
- Compare the old and new housings.
- Confirm the mounting points match.
- Confirm the connector is identical.
- Connect the wiring harness.
- Make sure the connector clicks securely into place.
Step 8 – Reinstall the Tail Light Assembly
Line up the locating pins and mounting points with the body.
Push the housing straight into position.
Reinstall the retainers or fasteners you removed earlier.
Tighten them only enough to hold the lamp securely. Overtightening can damage plastic mounting points.
Step 9 – Test Every Rear Light
Do not finish the job after testing only one function.
Check:
- Tail/running light
- Brake light
- Turn signal
- Hazard lights
- Reverse light
Also make sure the housing sits evenly against the body and does not feel loose.
How to Replace the Outer Tail Light Assembly
Replacing the complete outer assembly follows many of the same steps as replacing a bulb.
Open the liftgate, remove the retaining fasteners, pull the lamp straight outward, disconnect the wiring, and install the new assembly.
The most important part is choosing the correct side.
Driver-Side Tail Light Replacement
If replacing the driver-side lamp, verify that the replacement is specifically listed for the left side of the vehicle.
Do not assume the left and right housings are interchangeable.
Passenger-Side Tail Light Replacement
Use the same procedure on the passenger side, but order a right-side assembly.
Before fully securing the lamp, compare the panel gap with the opposite side. The housing should sit flush with the body.
How to Avoid Breaking the Mounting Clips
Broken mounting tabs are common when a tail light is pulled sideways.
To reduce the risk:
- Remove all visible fasteners first
- Pull the lamp straight outward
- Do not twist the housing
- Avoid metal pry bars near the paint
- Support the lamp when disconnecting the wiring
If a clip is already damaged, replace it rather than relying on excessive fastener pressure to hold the lamp in position.
How to Replace the Inner/Liftgate Tail Light
The inner lamps require a different approach because their mounting hardware is accessed from the liftgate.
Removing the Liftgate Trim Panel
Open the liftgate and inspect the interior trim near the lamp you want to replace.
Use a plastic trim tool to carefully release the panel clips.
Work around the panel gradually. Pulling one corner too hard can crack the plastic or break a retaining clip.
Some fasteners may need to be removed before the trim panel can be released.
Disconnecting the Inner Tail Lamp
Once you have access behind the lamp:
- Locate the electrical connector.
- Disconnect the wiring.
- Remove the lamp’s mounting nuts or fasteners.
- Support the lamp from the outside.
- Remove the assembly carefully.
Keep track of washers, nuts, and clips.
Installing the Replacement Inner Lamp
Position the new lamp in the liftgate.
Secure the mounting hardware, reconnect the electrical plug, and test the lamp before reinstalling the trim panel.
Once everything works correctly, refit the interior trim and make sure each clip is fully seated.
When Do You Need the Complete Tail Light Assembly?
A failed bulb does not always mean the entire housing needs replacement.
However, there are several situations where a complete assembly makes more sense.
Cracked or Broken Lens
A cracked lens allows rain, dirt, and moisture into the lamp.
Even if the lights still work, continued moisture exposure can damage sockets, connectors, and circuit boards.
Water or Condensation Inside the Housing
A small amount of temporary condensation can sometimes disappear on its own, but standing water or repeated heavy moisture usually indicates a sealing problem.
Check for:
- Cracks
- Failed seams
- Damaged seals
- Loose bulb sockets
- Missing vent components
Failed Integrated LED
Because the factory tail lamp includes integrated LED lighting, there may be no simple bulb to replace when the LED section fails.
After confirming that the connector, wiring, power supply, and related circuits are working, assembly replacement may be required.
Broken Mounting Tabs
A lamp with broken mounting tabs may shake, develop gaps, or allow water inside.
Replacing the assembly is often safer than trying to hold a damaged housing in place with improvised hardware.
Can You Replace Just the Tail Light Lens?
In most cases, replacing only the lens is not the easiest repair.
Many modern tail lamps are manufactured as sealed assemblies. If the lens is badly cracked or separated from the housing, replacing the complete unit usually provides a more reliable seal.
Why Is My Tail Light Still Not Working After Replacement?
Installing a new bulb does not guarantee the problem is solved.
If the light remains off, work through these checks before buying another part.
Check the Bulb and Socket
Remove the bulb and inspect it again.
Make sure:
- It is the correct bulb
- It is fully seated
- The socket locks into the housing
- The contacts are clean
A loose bulb can appear fine but still fail intermittently.
Check the Wiring Connector
Disconnect and reconnect the lamp connector.
Look for:
- Bent pins
- Loose terminals
- Melted plastic
- Damaged wires
- Corrosion
A connector that does not lock completely can cause an intermittent tail light.
Inspect for Corrosion
Moisture inside a lamp can corrode the bulb socket and electrical terminals.
Light corrosion may sometimes be cleaned, but heavily damaged sockets should be replaced.
Check the Fuse or Lighting Circuit
If several rear lights fail at the same time, the problem may be farther upstream in the electrical system.
Check the owner’s manual and the vehicle’s fuse information before replacing random fuses.
Do not assume every tail-light problem has a dedicated individual fuse.
Check for LED Assembly Failure
If the brake or turn-signal bulb works but the normal tail-light portion remains dark, the integrated LED circuit may be the problem.
At that point, inspect the connector and wiring before replacing the complete lamp.
When to Get Professional Diagnosis
Professional diagnosis is a good idea if:
- A new lamp does not work
- Several lights fail at once
- Fuses repeatedly blow
- Wiring is burned
- Water damage is severe
- The LED assembly receives power but remains off
- Dashboard warnings continue after replacement
Electrical troubleshooting becomes much faster when a technician can test voltage, ground, and circuit continuity directly.
OEM vs Aftermarket Tail Light Assembly
Both OEM-style and aftermarket assemblies can work well, but fitment quality varies.
OEM Tail Lights
OEM parts usually provide the closest match to the factory:
- Shape
- Lens design
- Connector
- Mounting points
- Light output
The downside is that OEM parts can cost more.
Aftermarket Tail Lights
Aftermarket assemblies are often cheaper and may offer different styling.
Before buying one, read the fitment details carefully.
A lamp that looks similar in a photo may have different mounting points, connectors, or lighting technology.
Inner vs Outer Assembly
Do not order a product simply labeled “rear tail light” without checking the position.
You need to know whether the part is:
- Outer body-mounted
- Inner liftgate-mounted
They are completely different assemblies.
Left vs Right Side
Always confirm driver or passenger side before ordering.
A left-side housing will normally not fit correctly on the right side.
LED Compatibility
If you are installing an aftermarket LED assembly, make sure it is designed for the 2014 Grand Cherokee’s electrical system.
Poorly designed LED products can sometimes cause warning messages, flickering, or unusual light behavior.
How Much Does It Cost to Replace a 2014 Jeep Grand Cherokee Tail Light?
The cost depends heavily on what actually failed.
Bulb Replacement Cost
A normal replaceable rear bulb is usually the least expensive repair.
If you do the work yourself, the main cost is the bulb.
Tail Light Assembly Cost
A complete lamp assembly costs considerably more than a bulb.
Pricing depends on:
- OEM vs aftermarket
- Inner vs outer lamp
- Driver vs passenger side
- New vs used
- Standard vs custom LED design
Because parts prices change regularly, compare current listings before buying.
DIY vs Mechanic Cost
If the problem is only a bulb or outer lamp assembly, DIY replacement can save labor costs.
A mechanic may be worth the additional expense when electrical diagnosis, damaged wiring, water intrusion, or integrated LED failure is involved.
Common Tail Light Replacement Mistakes
Most tail light jobs are straightforward, but several small mistakes can turn a quick repair into a frustrating one.
Avoid these problems:
- Buying the wrong bulb
- Confusing the brake bulb with the LED tail lamp
- Ordering an inner lamp instead of an outer lamp
- Ordering the wrong side
- Pulling the housing sideways
- Breaking mounting clips
- Pulling electrical connectors by the wires
- Overtightening fasteners
- Installing the socket without locking it
- Ignoring corrosion
- Failing to test every light before finishing
- Replacing the entire housing before diagnosing the circuit
Taking an extra minute to identify the failed light usually saves much more time later.
Frequently Asked Questions
What size tail light bulb does a 2014 Jeep Grand Cherokee use?
The answer depends on which rear-light function you mean. The rear turn/stop lamp uses a 3157/P27/7W bulb, while the auxiliary body-side reverse light uses a 7440/W21W bulb and the liftgate reverse light uses a 921/W16W bulb. The factory tail lamp itself includes LED lighting.
Does a 2014 Jeep Grand Cherokee have LED tail lights?
Yes. The factory rear body-side tail lamp and auxiliary liftgate tail lamp use LEDs.
How do you remove a 2014 Jeep Grand Cherokee tail light?
Open the liftgate, remove the retaining fasteners beside the outer lamp, and carefully pull the housing straight away from the body. Disconnect the electrical connector before servicing the bulb or replacing the assembly.
How do you change the brake light bulb on a 2014 Jeep Grand Cherokee?
Remove the outer tail lamp, locate the turn/stop bulb socket, remove the socket from the housing, replace the 3157-style bulb, and reinstall the lamp.
What bulb does the rear turn signal use?
The rear body-side turn/stop function uses a 3157/P27/7W bulb on the factory lighting system.
How do you replace the outer tail light assembly?
Remove the exterior retaining fasteners with the liftgate open, pull the housing straight outward, disconnect the wiring plug, connect the new assembly, align the mounting pins, and reinstall the fasteners.
How do you replace the inner liftgate tail light?
The inner lamp is accessed from inside the liftgate. Remove the appropriate trim panel, disconnect the electrical plug, remove the mounting hardware, and take the lamp out from the exterior side.
Are driver-side and passenger-side tail lights different?
Yes. Complete tail light housings are generally side-specific. Make sure you order the correct left or right assembly.
Why is my tail light not working after replacing the bulb?
Possible causes include an incorrect bulb, loose socket, corroded connector, wiring problem, fuse or circuit fault, or failure of the integrated LED portion of the lamp.
Can I replace only the tail light lens?
It may be technically possible with certain aftermarket parts, but many modern tail lamps are sealed assemblies. Replacing the complete housing is usually the more dependable repair when the lens is badly cracked.
Is there a fuse for the 2014 Jeep Grand Cherokee tail lights?
Rear-light circuits are protected electrically, but you should use the owner’s manual and the fuse information for your exact vehicle instead of assuming one specific fuse controls every tail-light function.
How much does a tail light replacement cost?
A bulb replacement is usually inexpensive, while a complete LED or tail light assembly can cost considerably more. Labor costs also vary depending on whether the problem is a simple replacement or requires electrical diagnosis.
Final Thoughts
Changing a tail light on a 2014 Jeep Grand Cherokee is usually a manageable DIY job once you know which rear light has actually failed.
The key is not to assume every problem is caused by the same bulb. The rear turn/stop and reverse lights use replaceable bulbs, while important sections of the factory tail-light system use integrated LEDs.
Identify the failed function first, confirm the correct bulb or assembly, remove the housing carefully, and test every rear-light function before closing the liftgate.
If a new bulb or lamp still does not work, stop replacing parts and inspect the socket, connector, wiring, and electrical circuit. A few minutes of proper diagnosis can prevent unnecessary repairs and get your Jeep safely back on the road.