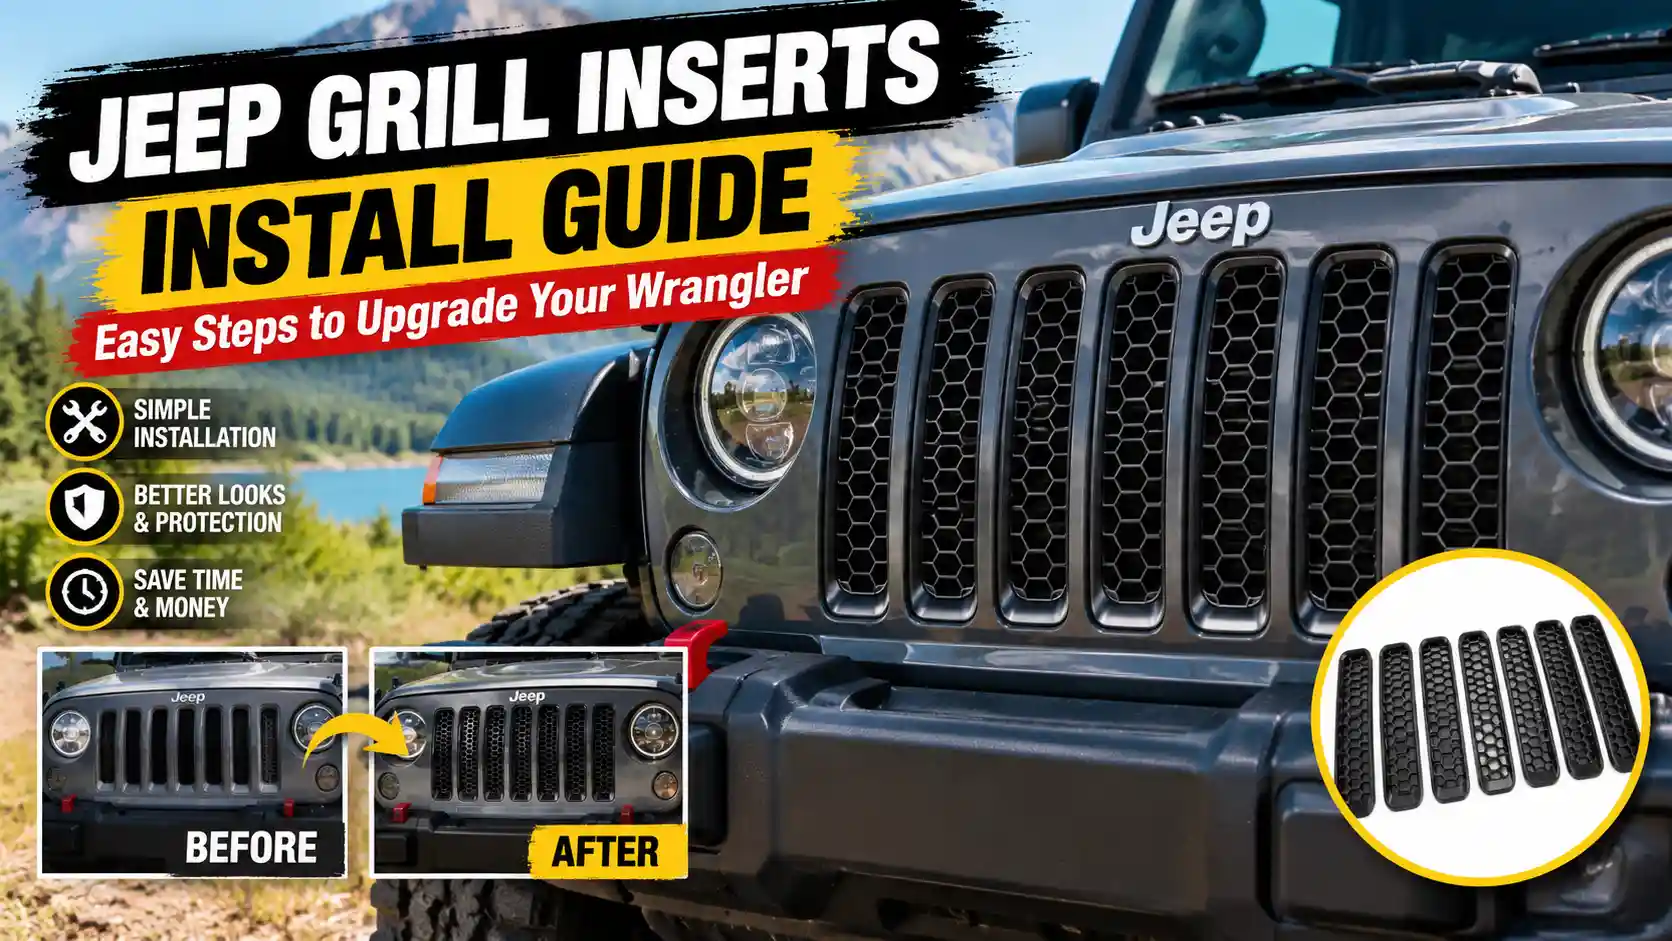
Installing grille inserts is one of the simplest ways to change the front-end look of a Jeep Wrangler while adding a little extra protection in front of the radiator. The job can be very easy, but there is one catch: not every Jeep grille insert installs the same way.
Some Wrangler grille inserts simply snap into the seven grille openings from the front. Others mount behind the grille with clips, brackets, or screws. You can also find adhesive-backed overlays that attach directly to the existing grille.
That means the right installation method depends on your Wrangler generation, trim, grille design, and the type of insert you bought.
This Jeep grill inserts install guide walks you through the process step by step. It also explains how to check fitment, remove the grille when necessary, avoid broken clips, work around a front trail camera, and fix common installation problems.
Important: Always check the instructions supplied with your grille insert before starting. Use this guide as a general Wrangler installation reference. Do not drill, cut, or permanently modify the factory grille unless the insert manufacturer specifically requires it.
Quick Answer: How Do You Install Jeep Wrangler Grille Inserts?
For a typical Jeep Wrangler grille insert installation:
- Park the Jeep on a level surface and turn it off.
- Confirm that the inserts fit your Wrangler year, generation, and trim.
- Open the hood.
- Clean the factory grille.
- Test-fit every insert before securing anything.
- Snap the inserts into place if you have front-mounted inserts.
- Remove the grille if your inserts mount from behind.
- Secure any supplied clips, brackets, screws, or adhesive.
- Reinstall the factory grille if it was removed.
- Check that every insert is straight and secure.
- Make sure the radiator openings and front camera remain clear.
- Inspect everything again after your first drive.
Some JK snap-in insert sets are specifically designed to install from the front without tools, tape, drilling, or grille removal. Other products follow completely different mounting methods.
So, before reaching for a screwdriver, identify exactly what you have.
Why Install Grille Inserts on Your Jeep Wrangler?
Most Wrangler owners install grille inserts for a mix of appearance and protection.
The factory seven-slot grille is one of the most recognizable parts of a Jeep. Inserts let you change that area without replacing the whole grille.
Depending on the insert design, they can:
- Give the Wrangler a cleaner or more aggressive front-end appearance
- Add black, chrome, billet, or mesh details
- Help reduce the amount of larger road and trail debris reaching the radiator area
- Cover open-looking grille slots
- Refresh faded or worn grille trim
- Add a custom look without a major body modification
Perforated and mesh-style inserts can provide a barrier in front of cooling components while still leaving openings for air to pass through. For example, current JK insert products are marketed specifically for added protection from road and trail debris.
The important part is choosing an insert designed for your specific Jeep.
Check Fitment Before You Start
A five-minute fitment check can save you from spending an hour trying to force the wrong inserts into your grille.
Look at the product label, installation sheet, or fitment information and confirm:
- Jeep Wrangler model year
- JK or JL generation
- Two-door or Unlimited model, if specified
- Sport, Sahara, Rubicon, Willys, or other trim restrictions
- Factory grille style
- Existing factory grille inserts or trim rings
- Front trail camera compatibility
- Hood-lock compatibility
- Other grille-mounted accessories
Jeep Wrangler JK and JKU
The JK generation covers 2007–2018 Wrangler models. JKU is commonly used to describe the four-door Wrangler Unlimited version.
Many JK grille insert kits are designed for the traditional seven open slots and may simply snap in from the front.
However, fitment can change when the Jeep already has factory grille trim.
For example, several current JK insert listings specifically exclude some 2016–2018 Sahara and 2017–2018 Rubicon, Hard Rock, or Back Country models equipped with factory grille inserts. Some grille-mounted hood locks can interfere as well.
Do not assume that an insert labeled “JK” automatically fits every JK trim.
Jeep Wrangler JL and JLU
The JL generation arrived for the 2018 model year and uses a different grille design from the JK.
This makes the model year especially important when shopping for inserts.
An insert made for a JK should not be treated as interchangeable with one made for a JL.
Special Warning for 2018 Jeep Wrangler Owners
The 2018 model year can cause confusion because both the outgoing JK and new-generation JL were sold during that period. MotorTrend’s 2018 model information lists both Wrangler JK models and the all-new Wrangler.
If you own a 2018 Wrangler, do not buy inserts based on the year alone.
Confirm whether the vehicle is:
- 2018 Wrangler JK
- 2018 Wrangler Unlimited JK
- 2018 Wrangler JL
- 2018 Wrangler Unlimited JL
The grille, mounting points, and insert shape may be different.
2024 and Newer Wrangler Grilles
Be extra careful when shopping for inserts or overlays for newer JL models.
The official 2024 Mopar grille catalog lists model-specific grille components, trim pieces, clips, and front-camera mounting hardware. Current aftermarket overlays are also sold specifically for 2024–2026 JL applications.
In other words, do not assume an older JL insert will automatically fit a newer grille just because both vehicles are called JL Wranglers.
Check the exact fitment first.
Sport, Sahara, Rubicon, and Special Editions
Trim level matters more than many buyers expect.
A standard Sport grille may have open slots where an aftermarket insert can snap into place. A Sahara, Rubicon, Recon, or another special edition may already have factory trim occupying that area.
If factory trim is present, you may need:
- A different insert design
- A behind-the-grille mesh panel
- A trim-compatible product
- Removal of the original trim, where appropriate
Never force a snap-in insert over factory trim that prevents the locking tabs from seating properly.
Types of Jeep Grille Inserts and How They Install
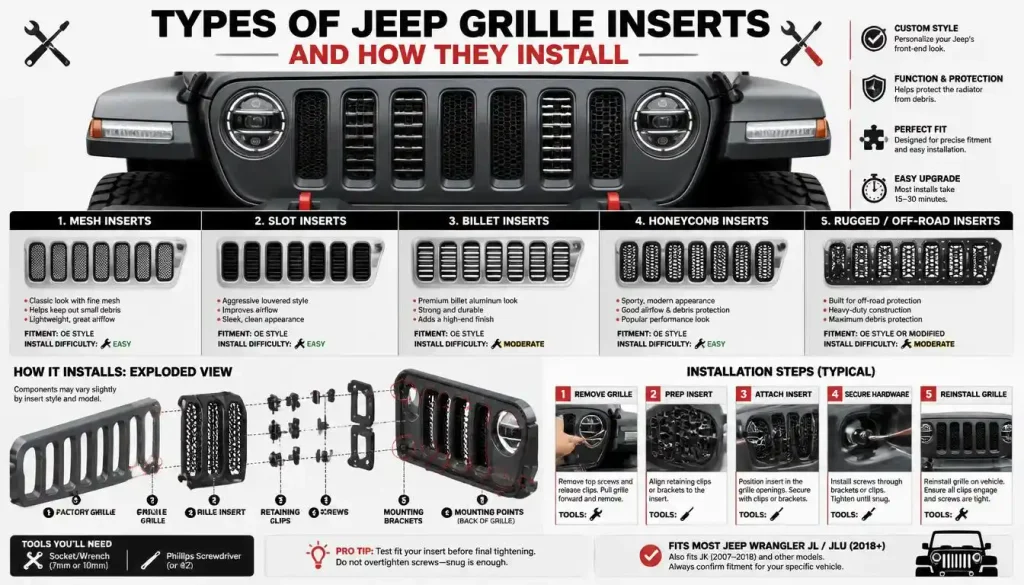
Before starting, identify which installation style you have.
Snap-In Grille Inserts
These are among the easiest options.
The insert is aligned with an individual grille slot and pressed into place until its molded tabs or hooks engage the factory grille.
Many require:
- No drilling
- No screws
- No grille removal
- Few or no tools
Some current JK snap-in products are designed exactly this way.
Mesh Grille Inserts
Mesh inserts may come as individual slot pieces or one larger panel that sits behind the grille.
Depending on the design, they may use:
- Molded clips
- Brackets
- Screws
- Zip-style retainers
- Existing factory mounting points
- Adhesive
Do not assume every mesh kit requires grille removal. Some front-installed JK mesh inserts can be fitted without removing the grille.
Billet Grille Inserts
Billet-style inserts usually use horizontal or vertical metal bars.
Some modern billet-look products snap directly into the grille. Other designs use hardware behind the factory grille.
Follow the supplied mounting instructions carefully because overtightening metal hardware against plastic grille parts can cause damage.
Behind-the-Grille Inserts
A behind-the-grille screen or panel usually requires more work.
You may have to:
- Remove the upper grille retainers.
- Pull the grille forward.
- Disconnect any wiring attached to it.
- Remove the grille.
- Position the insert from behind.
- Secure the supplied hardware.
- Reinstall the grille.
This type can be useful when factory slot trim prevents individual inserts from fitting.
Adhesive-Backed Grille Inserts and Overlays
Some overlays use automotive adhesive tape rather than clips or bolts.
Current 2024–2026 JL overlay products, for example, are available with pre-applied automotive-grade adhesive and no-drill installation.
With adhesive inserts, surface preparation matters just as much as alignment.
A dirty, wet, oily, or wax-covered grille can prevent the tape from bonding properly.
Drill vs. No-Drill Inserts
Many modern Wrangler insert kits are no-drill designs.
However, never assume your kit is.
Read the installation sheet before making any holes.
If the manufacturer does not instruct you to drill the grille, do not drill it just because a bracket appears difficult to align. A poor fit can be a sign that you have the wrong insert, wrong orientation, or wrong mounting position.
Tools and Supplies You May Need
A basic installation may require little more than your hands.
For a more involved grille insert installation, useful items include:
- Plastic trim-removal tool
- Flat-head screwdriver
- Phillips screwdriver
- Small socket and ratchet set
- Allen keys
- Microfiber cloth
- Mild automotive cleaner
- Masking tape
- Clean work towel
- Small container for clips and screws
- Manufacturer-supplied brackets and hardware
Older hardware-mounted JK insert instructions may also require the grille to be loosened and electrical connectors disconnected before the grille is removed.
Avoid using a metal screwdriver directly against a painted surface when a plastic trim tool will do the job.
Before Installation: Inspect the Parts and Prepare Your Jeep
Do not start by immediately pulling clips out of the grille.
Spend a few minutes preparing first.
Check the Package
Lay everything out on a clean surface.
Confirm that you have:
- All grille inserts
- Left/right or center-specific pieces, if applicable
- Mounting clips
- Brackets
- Nuts
- Bolts
- Washers
- Adhesive strips
- Installation instructions
If a seven-piece kit contains only six inserts, you want to know before disassembling the Jeep.
Inspect the Inserts
Look for:
- Broken tabs
- Cracked plastic
- Bent mesh
- Damaged coating
- Missing adhesive
- Distorted mounting holes
Do not install a damaged insert and expect the grille to hold it securely.
Clean the Factory Grille
Wash away:
- Dirt
- Dust
- Mud
- Wax residue
- Bug residue
- Road film
Dry the area completely.
This is especially important for adhesive-backed inserts.
How Long Does It Take to Install Jeep Grille Inserts?
Installation time depends on the design.
A simple snap-in or adhesive overlay can sometimes be installed quite quickly. A grille-removal installation will naturally take longer.
As a general guide:
| Insert Type | Typical Difficulty |
|---|---|
| Front snap-in inserts | Easy |
| Adhesive overlays | Easy |
| Front-mounted mesh inserts | Easy to moderate |
| Behind-grille mesh | Moderate |
| Hardware-mounted billet inserts | Moderate |
| Custom inserts requiring modification | Advanced |
Do not rush simply to meet an estimated installation time.
Correct alignment is more important than speed.
Jeep Grill Inserts Install Guide: Step-by-Step Instructions
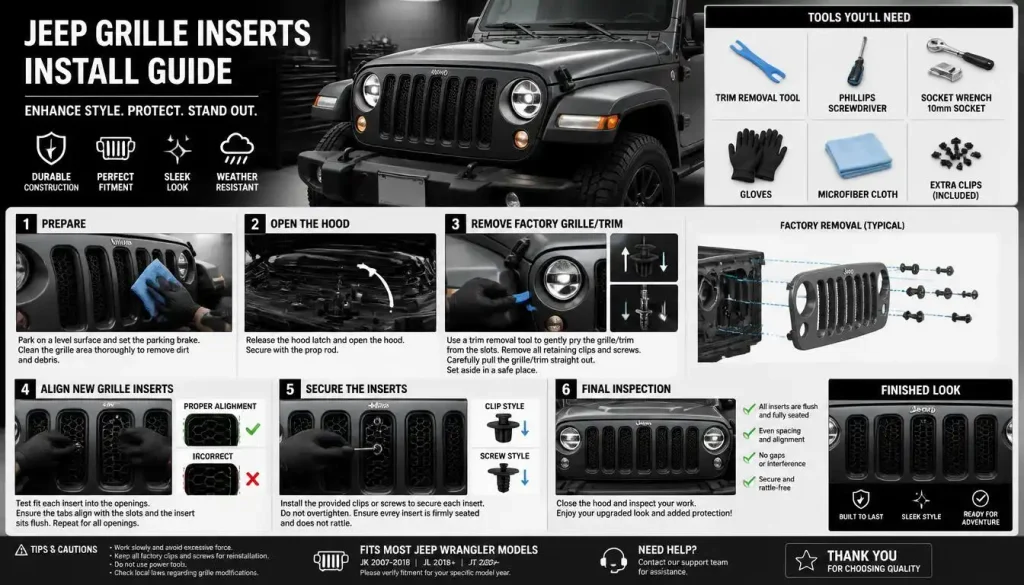
The following workflow covers the most common Wrangler grille insert installations.
Your particular kit may skip several of these steps.
Step 1: Park the Jeep Safely
Park on a flat, stable surface.
Turn off the engine and allow the front of the vehicle to cool if you have recently driven it.
Apply the parking brake.
You will be working close to the radiator, grille, wiring, and painted surfaces, so good lighting also helps.
Step 2: Open the Hood
Release and open the hood.
On many installations, this gives you access to the retainers across the top of the factory grille.
Do not remove anything yet if your inserts are designed to install directly from the front.
Step 3: Protect the Paint
Place masking tape or a soft protective material along any painted edge where tools may touch.
A small slip with a screwdriver can leave a mark that is far more annoying than the insert installation itself.
Step 4: Test-Fit the Inserts
This is one of the most important steps.
Place every insert against its intended opening without fully locking it in.
Check:
- Shape
- Orientation
- Top and bottom position
- Left/right position
- Clip alignment
- Camera clearance
- Existing trim interference
If an insert clearly does not follow the shape of the grille slot, stop.
Do not force it.
Step 5: Remove Upper Grille Retainers If Required
Skip this step for front-mounted inserts that do not require grille removal.
If the grille must come off, remove the factory retainers across the top carefully.
The exact retainer style varies.
A trim tool is useful because it can lift plastic retainers with less risk of scratching the grille.
Keep every clip in a safe container.
Step 6: Release the Factory Grille
Once the upper retainers are free, gently pull the top of the grille forward.
There may be additional attachment points lower down.
Work from one section to another instead of pulling hard from a single corner.
Plastic tabs can break if twisted too far.
Step 7: Disconnect Wiring If Necessary
Depending on the Wrangler and grille setup, wiring may be attached to lights or camera-related components.
Older JK grille-removal instructions show the need to disconnect turn-signal wiring before fully removing the grille.
Never allow the grille to hang by its wiring.
Release connectors using their locking tabs rather than pulling on the wires themselves.
Step 8: Remove Existing Inserts or Trim If Required
If you are replacing an old insert, remove it before installing the new one.
Work slowly around each retaining tab.
If factory trim rings are present, confirm that the new product is actually designed to replace them before taking anything apart.
Factory grille trim can prevent some aftermarket JK inserts from seating correctly.
Step 9: Clean the Mounting Area
Once the grille is accessible, clean the mounting surface again.
This makes it easier to see:
- Mounting slots
- Clip positions
- Old adhesive
- Dirt trapped behind the grille
- Damaged factory tabs
Remove old adhesive only with a method that is safe for the grille finish.
Step 10: Position the New Inserts
Place the new insert in its correct opening.
Start by aligning its locating tabs or mounting points.
Do not fully secure one side while the opposite side is obviously out of position.
For a seven-piece kit, take a moment to compare spacing between each insert before finalizing the installation.
Step 11: Secure the Insert
How you secure it depends on the kit.
You may need to:
- Press snap-in tabs until they engage
- Tighten a small bracket
- Install supplied screws
- Attach retaining clips
- Apply adhesive-backed overlays
- Secure a rear mesh panel
For bolts or screws, tighten them evenly.
Do not crush or distort the plastic grille.
If the manufacturer provides a torque specification, use it. If no torque specification is provided, do not invent one.
Step 12: Reconnect Electrical Components
Reconnect anything you unplugged.
Check that each connector is fully seated and its lock is engaged.
Keep wiring away from:
- Sharp edges
- Moving hood components
- Hot surfaces
- Pinch points
- Mounting hardware
Step 13: Reinstall the Factory Grille
Position the grille carefully.
Engage the lower or side mounting points first if required by your vehicle, then return the upper clips or retainers to their original positions.
Do not hit the grille to make it fit.
If it will not sit flush, something may be trapped behind it.
Step 14: Check Alignment
Stand several feet in front of the Jeep.
Look across all seven slots.
Check for:
- Uneven heights
- Crooked inserts
- Gaps
- One insert sitting deeper than the others
- Loose corners
Small alignment problems are much easier to fix now than after everything settles into place.
Step 15: Perform a Final Security Check
Press gently around each insert.
Nothing should rattle, move freely, or appear ready to fall out.
Close the hood carefully and make sure nothing interferes with normal hood operation.
You are now ready for a short test drive.
How to Install Snap-In Jeep Grille Inserts Without Removing the Grille
If your insert kit is designed for front installation, the job can be much simpler.
A common procedure is:
- Clean each grille slot.
- Identify the correct orientation of every insert.
- Position the lower or locating tabs first.
- Align the remaining clips with the factory grille.
- Apply even pressure around the insert.
- Listen or feel for the tabs engaging.
- Pull very gently on the insert to confirm it is secure.
- Repeat for the remaining grille slots.
Do not press only in the center.
Applying pressure near the actual clip locations gives the tabs a better chance of engaging without flexing the insert excessively.
Some JK grille inserts are specifically designed to snap into place from the front without removing the factory grille.
How to Install Adhesive Jeep Grille Inserts
Adhesive inserts look simple, but poor preparation can cause them to come loose.
1. Wash the Surface
Remove visible dirt and grime.
2. Remove Residue
The mounting area should be free from wax, oil, polish, and other products that can interfere with adhesion.
Use a grille-safe cleaner recommended for the surface.
3. Dry Everything
Do not trap water under an adhesive strip.
4. Test-Fit Before Peeling the Backing
Once strong automotive tape touches the grille, repositioning may be difficult.
Know exactly where the piece will sit first.
5. Peel the Backing
Remove only as much backing as necessary to begin positioning the insert.
6. Align the Insert Carefully
Check its relationship to the grille opening and adjacent pieces.
7. Press Firmly and Evenly
Apply consistent pressure along the adhesive area rather than pressing one small spot.
8. Follow the Adhesive Manufacturer’s Curing Instructions
Avoid washing, pulling on, or stressing the insert until the adhesive has had the recommended time to bond.
How to Install Mesh or Billet Inserts Behind the Grille
Behind-the-grille installations require more care because access is limited.
Once the factory grille has been removed:
- Place it face-down on a clean towel or padded work surface.
- Position the mesh or billet insert behind the grille openings.
- Center the insert from the front before tightening anything.
- Install the supplied brackets or retaining hardware.
- Tighten opposite sides gradually to keep the panel centered.
- Make sure no sharp edge contacts wiring.
- Check that hardware does not interfere with the radiator or other components.
- Turn the grille upright and inspect the appearance.
- Reinstall it only after you are happy with the alignment.
Avoid overtightening hardware against plastic mounting points.
“Tighter” does not always mean “more secure.”
How to Remove Existing Jeep Grille Inserts
If you are replacing old inserts, removal depends on the mounting style.
Snap-In Inserts
Reach the retaining tabs from the back when possible.
Release one tab at a time while supporting the insert from the front.
Do not simply pry the face outward.
Adhesive Inserts
Gentle, controlled removal is better than sudden pulling.
Warm conditions may make automotive adhesive easier to work with, but avoid excessive heat that could damage plastic or paint.
Remove leftover adhesive with a surface-safe method.
Bolted or Bracket-Mounted Inserts
Support the insert while loosening the hardware.
Keep track of every washer, bracket, and nut.
If you plan to reuse the inserts, label the hardware or take a photo before disassembly.
Jeep Wrangler JK vs. JL Grille Insert Installation
JK and JL Wranglers share the famous seven-slot design, but that does not make their grille inserts interchangeable.
| Feature | Wrangler JK | Wrangler JL |
|---|---|---|
| Generation | 2007–2018 | Introduced for 2018 |
| Insert shape | JK-specific | JL-specific |
| Front snap-in options | Common | Product-dependent |
| Factory trim concerns | Yes | Yes |
| Grille removal | Product-dependent | Product-dependent |
| Trail camera concern | Less common | Important on equipped models |
| 2018 identification | Essential | Essential |
The safest rule is simple:
Buy by generation, year, trim, grille style, and camera equipment—not by appearance alone.
Special Considerations for 2018 Jeep Wranglers
If your registration says 2018, pause before ordering parts.
The old JK and new JL overlapped during the 2018 model year.
A listing that says “fits 2018 Wrangler” is not enough information by itself.
Confirm the generation using your vehicle details and the seller’s fitment system.
This one check can prevent:
- Wrong clip spacing
- Incorrect slot shape
- Poor alignment
- Returns
- Broken mounting tabs
- Wasted installation time
Installing Grille Inserts on 2024 and Newer Wranglers
Newer Wrangler grilles deserve another fitment check before installation.
Current Mopar parts listings for 2024 Wrangler grilles include dedicated grille components and front camera brackets, while aftermarket companies sell products specifically designed around newer applications.
Before installing, confirm:
- Exact model year
- Trim level
- Factory grille style
- Front-camera equipment
- Insert or overlay application years
Avoid modifying an older insert to make it “almost fit” a newer grille.
A correct-fit product should not require random trimming simply to follow the grille shape.
Installing Jeep Grille Inserts With a Front Trail Camera
The front camera is one of the most important compatibility checks on camera-equipped Wranglers.
A decorative insert can physically fit the grille and still be unsuitable if it blocks the camera.
Current 2024 grille insert products are offered in separate configurations for Wranglers with and without a front trail camera, showing why camera compatibility must be checked before purchase.
Before finalizing the installation:
- Locate the camera.
- Check the insert’s camera opening.
- Make sure the camera lens has a completely clear view.
- Check that wiring is not stretched.
- Confirm no bracket presses against the camera harness.
- Start the vehicle.
- Test the front camera display.
If part of the insert appears in the camera image, stop and correct the problem.
Do not sacrifice camera visibility for appearance.
Common Jeep Grille Insert Installation Mistakes
Most installation problems come from a few avoidable mistakes.
Buying for the Wrong Generation
JK and JL parts are not automatically interchangeable.
This is especially easy to get wrong with a 2018 Wrangler.
Ignoring Trim-Level Restrictions
Factory Sahara, Rubicon, or special-edition grille trim can occupy the same mounting space an aftermarket insert needs.
Forcing an Insert That Does Not Fit
An insert that requires extreme force is trying to tell you something.
Stop and check:
- Orientation
- Model
- Trim
- Clip position
- Existing factory trim
Skipping the Test-Fit
Always test-fit adhesive or hardware-mounted pieces before final installation.
Breaking Factory Clips
Cold or aged plastic can be less forgiving.
Use controlled pressure rather than bending a retainer far beyond its normal movement.
Overtightening Screws
Too much force can crack the insert, distort the grille, or strip a plastic mounting point.
Installing Adhesive Over Dirt or Wax
A beautiful install is not very useful if the insert falls off after the first wash.
Blocking the Trail Camera
Always inspect camera clearance from both outside the Jeep and on the camera display.
Forgetting Electrical Connectors
If the grille was removed, confirm every disconnected component works before finishing.
Ignoring Other Accessories
A hood lock or grille-mounted accessory can interfere with certain inserts. Some current JK insert products specifically list hood-lock incompatibility.
What to Do If Your Jeep Grille Insert Does Not Fit
Do not start cutting plastic immediately.
Use the symptoms to find the cause.
The Insert Is Too Tight
Check whether:
- It is upside down
- It belongs to another grille slot
- Factory trim is blocking it
- You bought a JK insert for a JL
- The product excludes your trim
- A clip is folded or misaligned
The Insert Is Loose
Look for:
- A clip that never engaged
- A broken mounting tab
- Missing hardware
- Incorrect orientation
- An insert designed for another grille style
Do not rely on random glue to compensate for a badly fitting snap-in part.
The Clips Will Not Lock
Remove the insert and inspect the clip path.
Sometimes one edge enters correctly while the opposite edge sits on top of the factory grille instead of behind it.
Realign before applying more pressure.
Mounting Holes Do Not Line Up
Check the instructions again.
Do not enlarge holes unless the manufacturer specifically tells you to.
Mismatched holes can indicate the wrong bracket, wrong orientation, or wrong application.
The Adhesive Will Not Stick
Possible causes include:
- Dust
- Wax
- Oil
- Moisture
- Old adhesive
- Incorrect surface preparation
- Installation outside the adhesive’s recommended conditions
Remove the insert and correct the surface problem instead of stacking more tape over contaminated adhesive.
The Trail Camera Is Blocked
Stop using the insert until the problem is corrected.
You may need a camera-compatible version rather than modifying a non-camera insert.
How to Avoid Breaking Grille Clips or Scratching Paint
Wrangler grille removal is not difficult when done patiently.
A few habits make the job safer.
- Use a plastic trim tool where possible.
- Do not lever a metal screwdriver against painted surfaces.
- Pull clips in the direction they are designed to release.
- Work gradually across the grille.
- Support the grille when disconnecting wiring.
- Place the removed grille on a towel.
- Keep screws and clips in a container.
- Never force a grille that still appears attached somewhere.
If a retaining clip feels unusually tight, stop and inspect it rather than increasing force blindly.
A replacement clip is inexpensive, but avoiding damage is easier.
Do Jeep Grille Inserts Affect Radiator Airflow or Cooling?
A properly designed grille insert should leave enough open area for normal airflow, but design matters.
Mesh, perforated, and billet inserts place material in front of the radiator opening. That means you should never install a homemade solid panel or heavily blocked insert without understanding how it affects cooling.
Choose inserts designed specifically for your Wrangler.
After installation, watch for unusual cooling behavior, particularly if your Jeep regularly sees:
- Hot weather
- Slow off-road driving
- Heavy towing
- Mud
- Sand
- Steep trails
Also keep the insert clean.
A mesh panel that is open when new can become restrictive if it is packed with mud, leaves, insects, or debris.
Do Grille Inserts Protect the Radiator From Rocks and Debris?
Some inserts can provide an additional barrier between the open grille and the components behind it.
Perforated JK insert products, for example, are specifically designed to help block road and trail debris from reaching cooling components.
However, grille inserts are not armor.
They may help with smaller debris, but they cannot guarantee protection against every stone, branch, collision, or off-road impact.
Think of them as an extra layer rather than complete radiator protection.
Final Installation Check Before Driving
Before closing the toolbox, inspect the Jeep one more time.
Use this checklist:
- All seven inserts are correctly positioned.
- Every clip is engaged.
- All supplied hardware is installed.
- Nothing rattles.
- Grille retainers are back in place.
- Wiring is connected.
- Wiring is not pinched.
- Front camera view is clear.
- Hood opens and closes normally.
- No insert touches a moving component.
- No loose tool or fastener remains in the engine bay.
- Radiator openings are not accidentally covered.
Take a short drive.
When you return, check each insert again.
A loose corner is much easier to fix in the driveway than on a highway or trail.
How to Maintain and Clean Jeep Grille Inserts
Grille inserts sit in one of the dirtiest areas of the vehicle.
They regularly face:
- Rain
- Dust
- Mud
- Bugs
- Road grime
- Gravel
- Winter salt
- Car-wash chemicals
Clean them whenever you wash the Jeep.
Use a soft brush or microfiber cloth for difficult areas.
If You Drive in Snowy Areas
Owners in parts of the USA, Canada, and the UK may deal with road salt and winter grime.
Clean metal inserts regularly and inspect the finish for corrosion.
If You Drive in Dusty or Off-Road Areas
Australian conditions, dry trails, desert roads, and dusty off-road routes can quickly fill fine mesh.
Inspect the grille more often if the Jeep spends time in heavy dust or mud.
After Off-Road Driving
Check:
- Mesh condition
- Mounting hardware
- Clips
- Bent sections
- Mud buildup
- Branches or vegetation
- Camera visibility
A two-minute inspection can prevent a small problem from becoming a lost insert later.
When Should You Replace a Jeep Grille Insert?
Replace or repair an insert when you notice:
- Broken locking tabs
- Cracked plastic
- Bent mesh
- Serious corrosion
- Loose mounting points
- Missing hardware
- Peeling adhesive
- Large areas of coating failure
- Permanent camera obstruction
- Damage that prevents secure installation
An insert that repeatedly comes loose should not simply be pushed back into place forever.
Find the reason it is loose.
The mounting tab or factory grille itself may be damaged.
Frequently Asked Questions About Jeep Grille Insert Installation
Can I Install Jeep Grille Inserts Myself?
Yes. Many grille inserts are designed as DIY accessories and require only basic mechanical ability.
Simple snap-in designs can be particularly beginner-friendly.
More complicated behind-the-grille systems may require grille removal, wiring disconnection, brackets, and additional tools.
Do I Have to Remove the Jeep Grille to Install Inserts?
Not always.
Some inserts snap into the grille openings from the front and do not require grille removal. Certain JK mesh inserts are also specifically designed for front installation.
Other inserts mount from behind and require access to the rear of the grille.
Check your product instructions before removing anything.
Can You Install Jeep Grille Inserts Without Tools?
Some can.
Several JK snap-in products are designed for tool-free installation.
However, grille-removal or bracket-mounted inserts normally require basic hand tools.
Do Jeep Grille Inserts Require Drilling?
Many do not.
Snap-in, clip-in, and adhesive products often avoid drilling entirely.
Never drill the factory grille unless your specific product instructions require it.
How Long Does It Take to Install Wrangler Grille Inserts?
A simple front-mounted or adhesive insert can be a quick project. Removing the grille and installing rear-mounted hardware takes longer.
Current JK snap-in listings commonly rate the job at less than an hour, while a current 2024–2026 adhesive overlay lists an approximate 15-minute installation.
Your actual time will depend on experience and product design.
Will Grille Inserts Fit Every Jeep Wrangler?
No.
Fitment can vary by:
- Generation
- Year
- Trim
- Factory grille
- Existing grille trim
- Front camera
- Hood lock
- Other accessories
Always check the exact application before ordering.
Are JK and JL Grille Inserts the Same?
No.
They belong to different Wrangler generations and use different grille designs.
Buy an insert specifically listed for your Wrangler generation.
Why Is a 2018 Wrangler Different?
Because 2018 was an overlap year in which the JK and the new Wrangler generation were both available.
Confirm whether your Jeep is a JK or JL before buying grille parts.
Can I Install Grille Inserts on a Wrangler With a Front Trail Camera?
Yes, if the insert is designed to work with the camera.
Some current insert products are sold in separate “with camera” and “without camera” versions.
Never install an insert that blocks the camera lens.
Do Jeep Grille Inserts Affect Airflow?
A Wrangler-specific perforated or mesh insert is designed with openings that allow air through, but you should still keep it clean and avoid designs that excessively block the radiator opening.
Monitor your Jeep normally after making any front-end modification.
Why Is My Jeep Grille Insert Loose?
Common causes include:
- A clip did not engage
- Broken tabs
- Missing hardware
- Wrong fitment
- Existing grille damage
- Failed adhesive
- Incorrect installation orientation
Remove and inspect the insert rather than continually pushing it back into place.
Can Grille Inserts Damage the Factory Grille?
Correctly fitted inserts should not require excessive force.
Damage is more likely when an owner forces the wrong part, overtightens hardware, pries against painted surfaces, or breaks plastic retaining tabs during removal.
Can I Remove Jeep Grille Inserts Later?
Most aftermarket inserts can be removed.
Snap-in inserts usually require releasing the retaining tabs. Hardware-mounted inserts can be unbolted. Adhesive overlays may require more careful removal and adhesive cleanup.
Should I Recheck the Inserts After Installation?
Yes.
Inspect them after the first drive and periodically afterward, especially after:
- Off-road trips
- Long highway drives
- Heavy mud
- Snow
- Car washes
- Rough roads
This is a simple way to catch a loose clip or fastener early.
Final Thoughts
Installing Jeep grille inserts can be an easy weekend project, but the best results start before you touch the grille.
First, confirm exactly which Wrangler you own. Pay special attention to 2018 models, trim-specific factory grille pieces, newer JL grille designs, hood locks, and front trail cameras.
Next, identify how your inserts actually mount. A snap-in insert that installs from the front should not be treated like a behind-the-grille mesh panel, and an adhesive overlay needs completely different preparation from a bracket-mounted billet insert.
Take your time with the test-fit. Protect the paint. Do not force plastic clips. Do not drill unless your product specifically requires it. If you remove the grille, reconnect every electrical component before finishing.
Once everything is straight and secure, give the Jeep a short drive and inspect the inserts again.
Done properly, a Jeep grille insert installation is a relatively simple way to personalize the Wrangler’s seven-slot grille while adding another layer between road or trail debris and the area behind it.